Wildfire home hardening does not start with a bunker. It starts with small, smart upgrades that keep embers out and fuels away from the house. Think ember resistant vents, a clean five foot perimeter, a Class A roof, ignition resistant siding, and a maintenance routine that would make your future self say thank you. This guide walks you through practical steps that cut ignition risk without wrecking your budget or your weekends.
Why embers start most home fires
During a wildfire, wind driven embers travel far ahead of the flame front. Those tiny firebrands flow with the wind like angry bees. They pile into corners, screens, gutters, and under decks. Most homes ignite this way, not from a wall of flame. Prevent the ember entry points, remove easy fuels, and your odds improve fast.
State level guidance backs this up. CAL FIRE highlights attic and foundation vents, roof edges, gutters, and decks as common ember targets that you can upgrade or maintain. The Insurance Institute for Business and Home Safety reaches the same conclusion with its Wildfire Prepared Home checklist. Their priorities are clear. Harden vulnerable openings. Keep a five foot ember resistant zone. Use a Class A roof. You can find their research backed list at IBHS Wildfire Prepared Home.
If you are reading this because your home already took a hit, take a breath. Then grab practical fire damage recovery tips so you can move from panic to a plan.
Quick five minute risk reducer
Start with the easy stuff you can do right now. No ladder required for the first two.
Kick pine needles and dry leaves out of the five foot perimeter. This includes under decks and under patio furniture. Stow doormats, brooms, and outdoor cushions inside the garage during red flag days. Move firewood to at least thirty feet away, preferably uphill and on bare soil or gravel. Scan your vents. If you can see plastic mesh or a large open louver, put vent upgrades on your weekend list. If you can do it safely, scoop leaves from the first reach of the gutter with a glove. Then schedule a real cleaning if you cannot finish the run yourself.
Ready for a deeper look or a professional set of eyes. We can help. Start with our Fire Damage Restoration services to request an exterior risk review or a vent upgrade estimate.
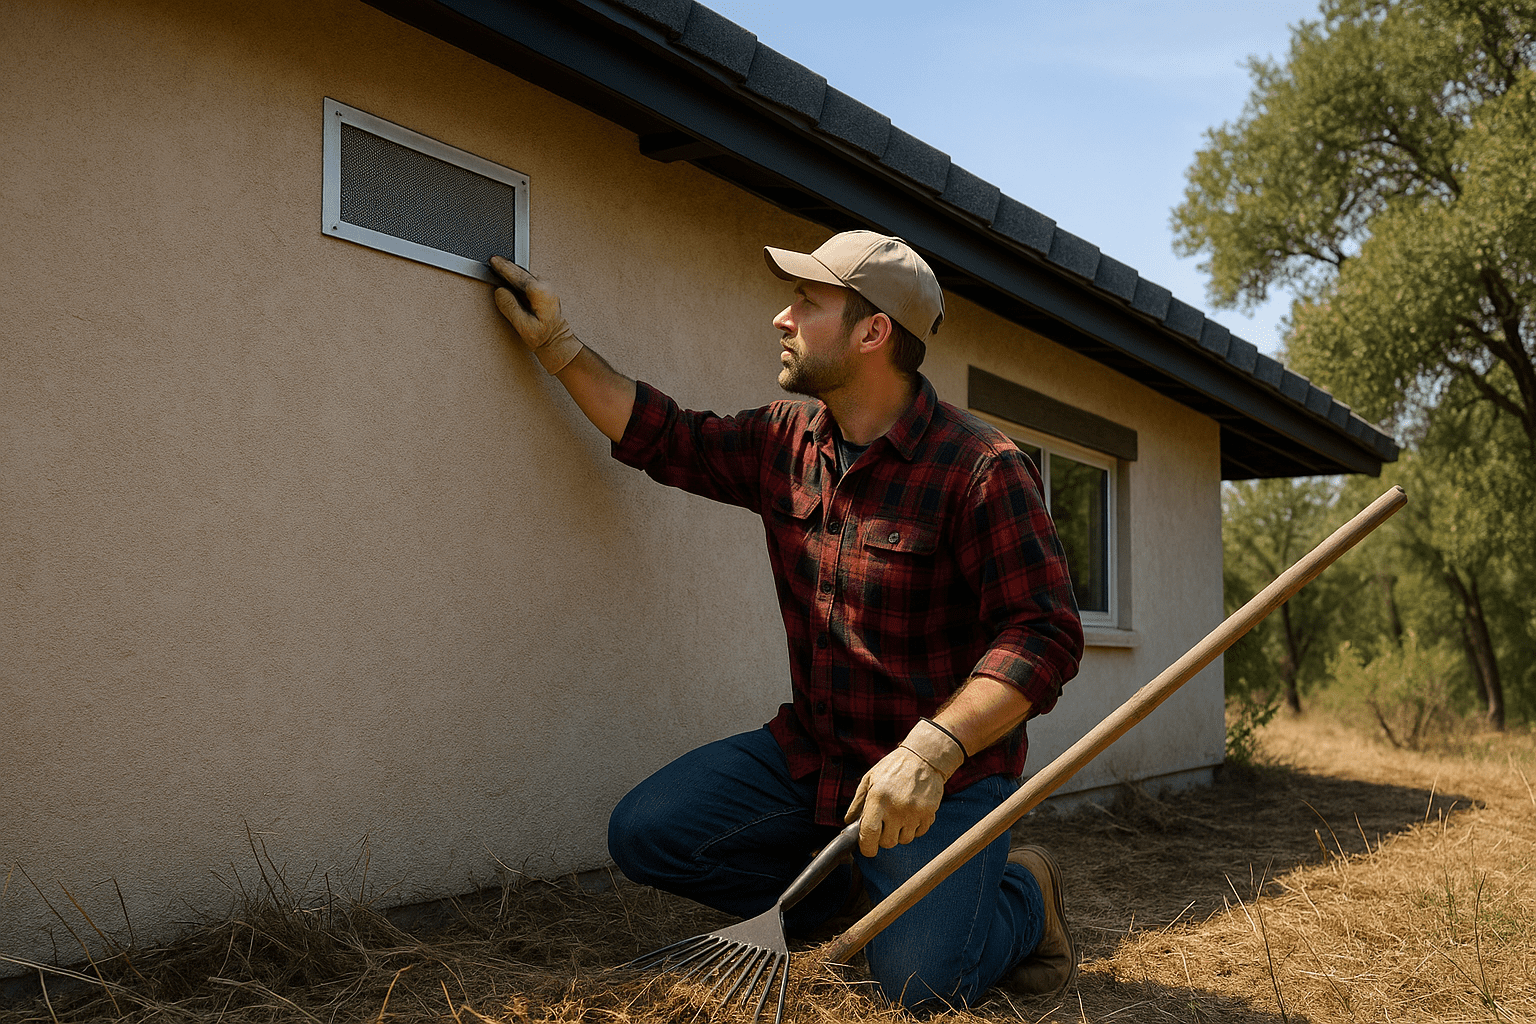
Ember resistant vents that work
Vents are both necessary and risky. You need airflow to keep moisture out of your attic and crawlspace. During a wildfire, those same openings act like a filter for embers. The fix is simple in concept. Keep the ventilation function. Block the ember intrusion. There are two main strategies. Replace old vents with ember and flame resistant models that carry a recognized listing. Or add corrosion resistant metal mesh with a small aperture over existing vents. Both paths reduce ember entry. Choose with care so you do not choke off required airflow.
Mesh size and materials
CAL FIRE recommends corrosion resistant metal mesh between one sixteenth and one eighth inch for attic, soffit, and foundation vents. Stainless steel or galvanized steel mesh holds up best. Skip plastic or fiberglass mesh. Those soften or melt under heat and can fail right when you need them most. You can read the state guidance at the CAL FIRE Home Hardening page.
Mesh alone is not magic. As mesh gets finer, it reduces the net free ventilation area. This can change the moisture balance in an attic or crawlspace. A finer mesh may collect lint, seeds, or dust faster too. Before you retrofit with mesh, check your current vent area and plan for any changes needed to meet local building ventilation requirements. Talk with your building department if you have questions.
Standards and listings to look for
If you choose replacement vents, look for products tested to ASTM E2886, which is a test method for wildfire resistant vents. The test simulates burning embers and direct flame exposure. You can read the standard description on the ASTM E2886 page. In California, many homeowners look for vents listed in the Office of the State Fire Marshal Wildland Urban Interface Product Handbook. State Fire Marshal listed vents have been vetted for performance under ember and flame exposure. UC ANR provides a helpful overview of vent choices, screening materials, and how those listings work at its Fire Network vents page at UC ANR Fire Network vents.
Types of ember resistant vent solutions
Single piece wildfire vents. These replace the entire vent with a unit that resists ember entry. Some use fine stainless mesh with an internal baffle. Others add an intumescent layer that swells in heat to seal openings. Look for State Fire Marshal or ASTM test references in the specifications. Brand examples include BrandGuard and similar. This is not an endorsement. It is a pointer to features you should seek.
Retrofit vent covers. These mount over existing vents with stainless mesh and a shield that limits direct ember exposure. Some are shaped to disrupt airflow patterns that would carry embers inward. Good for quick upgrades when full vent replacement is not practical.
Mesh plus frame upgrades. For louvers or gable inlets that lack any screen, a rigid frame with stainless steel mesh can be fastened in place. Keep the mesh within the one sixteenth to one eighth inch range. Make sure the frame is tight to the substrate. Seal gaps with appropriate flashing or fire resistant sealant. Never use foam that can ignite or melt.
Cost and installation reality
Off the shelf ember resistant vents can run from about ten dollars up to three hundred dollars each depending on size and design. A small foundation vent can sit around the sixty dollar mark. Soffit strips can land between fifty and one hundred. Large dormer or gable assemblies cost more. Retailers like Home Depot list wildfire rated soffit vents from brands such as BrandGuard. You can see a representative example on their site by searching for an ember resistant soffit vent with a three inch profile. Labor can equal or exceed the product price when soffit or stucco cuts are needed. Factor that into your plan.
Always confirm that your final vent setup maintains adequate ventilation. Net free vent area matters for moisture control and roof system health. If you suspect the change will reduce vent area, consider adding additional vents that meet the wildfire rating so the total airflow remains compliant. Your local building official can help with the math on your specific roof and attic configuration.
Practical vent retrofit steps
Walk your home with a notepad. List every vent. Attic intakes at eaves. Soffit vents. Gable vents. Ridge vents. Dormer vents. Foundation crawlspace vents. Laundry and bath exhausts. Even dog doors if they exist. If a vent already carries a wildfire listing, confirm the label and condition. If it is corroded, cracked, or missing parts, replace it.
For unprotected vents, choose either a State Fire Marshal listed replacement or a corrosion resistant mesh retrofit. Frame the mesh securely with screws into solid backing. Use stainless fasteners. Seal small gaps at edges with metal flashing or fire rated sealant. At tile roof edges, install bird stops to block ember and debris entry at the first course. That little gap at the tile nose is a known ember pathway. Fire Safe Marin offers a good visual of bird stop placement on their roof pages.
After install, look at the attic or crawlspace during daylight. If you see points of light besides the vent opening, you still have gaps. Last step, put vent inspection on your yearly checklist. Wind and pests are persistent. Screens and frames need periodic attention.
Common vent upgrade questions
Do vents need one eighth inch mesh. CAL FIRE and IBHS both recommend metal screening in the one sixteenth to one eighth inch range. Check the product specification for aperture size. You can go finer, but then you must account for reduced airflow and faster clogging.
Will vent covers cause moisture problems. They can, if you reduce the net free area too far. Use products with published ventilation values. Add vents or larger units if needed so you meet code requirements for attic and crawlspace ventilation. When in doubt, ask your building department or a qualified contractor.
Defensible space by zone
Home hardening is half the story. The other half is fuel management around the structure. CAL FIRE breaks the near home area into zones. The closest ring from zero to five feet is often called the ember resistant zone. Keep this area as clean and noncombustible as possible. No wood mulch. No shrubs under windows. No dry leaves. No firewood. Use gravel or stepping stones. Pick plants with high moisture content if you must plant in this zone. During fire weather, move doormats and patio cushions inside.
From five to thirty feet, think lean, clean, and green. Keep grass short. Break up continuous beds of fine fuels. Separate shrubs so canopies do not touch. Trim low tree branches. Clear leaf litter under trees and under decks. Place patio furniture on hard surfaces rather than bark or wood chips. Maintain spacing so a surface fire has fewer paths to the structure.
From thirty to one hundred feet, reduce fuel density and ladder fuels. Ladder fuels let a surface fire climb into tree canopies. Space trees appropriately for your slope and species. Prune to maintain vertical separation between shrubs and tree crowns. Create breaks in fuels with paths, gravel strips, or well irrigated groundcovers. In some regions, one hundred feet is the minimum required defensible space. Check your local requirements and what CAL FIRE outlines at its Defensible Space page.
Consistency beats perfection. A well maintained five foot zone can stop an ember shower from creating a line of spot fires up against your siding. A clean gutter can stop a roof edge ignition. Ten minutes after wind events and once a week during fire season makes a difference.
Roof, siding, and openings
The roof takes the brunt of ember attack. It has large surface area. It often holds debris at edges and valleys. It has gaps at ridges, ends, and penetrations. IBHS and CAL FIRE both push a clear message. Use a Class A roof covering. Asphalt fiberglass shingles rated Class A perform well. Tile and metal can work if installed with bird stops and sealed gaps. A Class A roof without regular cleaning can still burn if debris piles up in gutters or valleys. So pairing the right material with maintenance is key. IBHS explains those priorities on its Wildfire Prepared Home page.
Siding choice matters too. Noncombustible or ignition resistant claddings like fiber cement, stucco, brick, or stone reduce direct flame spread up the wall. Where you have combustible siding like wood, add a six inch noncombustible strip at the base. Metal flashing or a cementitious trim detail can serve that role. Seal joints. Replace cracked or missing caulk at windows and doors. Install metal flashing where decks meet walls so embers cannot settle behind a ledger or trim.
Openings invite embers. Windows can crack under radiant heat. Tempered glass survives better than standard glass. Double pane helps too. Keep screens in good condition. Metal screens beat plastic. Doors should seal tight with metal thresholds and intact weatherstripping. Garage doors should have good bottom seals with no gaps at the sides. A wide gap under a garage door can act like a vacuum during wind gusts.
Gutters, decks, and exterior upkeep
Gutters collect leaves and needles then hold them right against the roof edge. Add embers plus a dry day and you have kindling held in a trough. Clean gutters at least at the start and peak of fire season. Clean again after wind events. CAL FIRE stresses regular gutter cleaning and use of noncombustible gutters or metal gutter covers where practical. Their guidance is summed up on the Home Hardening page.
Decks deserve equal attention. Embers collect between deck boards, at the ledger, and in the space under the deck. Keep the deck surface clean. Move stored items off the deck during red flag periods. Close gaps to the house with flashing. For the under deck area, remove weeds and debris. If the deck is elevated, consider enclosing the under deck perimeter with corrosion resistant metal mesh in the one sixteenth to one eighth inch range. This limits ember access and keeps tumbleweeds and debris from piling up. The Building America Solution Center describes wildfire resistant deck strategies that balance materials and maintenance.
Fences can act like fuses. Where a wood fence meets the house, replace the last section near the wall with a noncombustible segment such as metal or masonry. Gate hardware fares better in steel than in vinyl. Keep the area below gates free of debris and weeds.
Maintenance schedule that actually sticks
Write it down. Put it on your calendar. The best hardening work fails if debris piles up again. Short sessions spread through the season work better than a once a year marathon.
During fire season, clear leaves and needles from roofs and decks every few weeks or after any wind event. Rake the five foot perimeter weekly. Indoor time is not off the hook either. Peek into the attic for signs of moisture or staining after any vent changes. If you see musty odor, increase ventilation by adding an additional wildfire rated vent or restoring some net free area with approved products.
Each spring, do a full perimeter walk. Look at vents, eaves, roof edges, and siding. Check for gaps at flashing, broken screens, loose bird stops, cracked caulk, and rodent openings. Replace damaged shingles or tiles. Re fasten any loose metal fascia covers. Test garage door seals. Clean and test outdoor outlets and covers. Confirm that any foam backer you used is covered by noncombustible trim, since exposed foam is a hazard.
Each fall, clean gutters fully. Flush downspouts. Add metal gutter covers if your tree load makes constant cleaning impossible. Adjust irrigation so that near house plantings do not stress and shed dry material. Re clear under decks and stairs.
Once a year, pull out your vent list. Re inspect every vent you touched in past seasons. Clean off lint or dust. Confirm screens are intact. Tighten fasteners. If you installed retrofit mesh, confirm it has not corroded. Replace anything that shows daylight around edges. Keep those receipts and product info handy in a binder or a folder. If you ever sell, buyers love to see the wildfire hardening record.
Real world example from our crew
Last season a client called after a fast moving fire pushed an ember shower through her foothill neighborhood. She had not finished every upgrade but she had knocked out a handful of high value tasks. We installed State Fire Marshal listed ember resistant vents at her soffits. We added bird stops along the first course of her tile roof. She swapped wood mulch in the first five feet for gravel. She also kept gutters clean. Embers piled along windward walls and in the valley near a chimney. The gravel zone did not ignite. The vents did their job. Her home came through with some scorch on patio furniture and a little soot in the eaves that we cleaned the next day. Her neighbor two doors down had heavy pine needles in the gutters. The fire found that fuel. The roof edge lit and scorched fascia before the engine company knocked it down. Same fire. Different prep. Small upgrades made a big gap in outcome.
When to call a pro
You can do a lot of this work yourself with a blower, a mask, and a good Saturday playlist. Hire help when you see stucco cuts, structural repairs, or roofing that requires specialized tools. If you took damage during an event, secure the opening first. We provide Emergency board-up and stabilization any time. Then we can talk through vent replacements, gutter work, and siding upgrades so your home is tougher before the next red flag week.
FEMA maintains a practical wildfire readiness page with homeowner steps that match what you read here. Good cross check, simple tips, no fluff. Review it at FEMA Wildfires readiness.
Frequently asked questions
Do I need one eighth inch mesh on every vent
For most attics, soffits, and crawlspaces, metal mesh between one sixteenth and one eighth inch is recommended by CAL FIRE. Smaller mesh can clog faster. Larger openings pass embers. If you buy listed wildfire vents, follow the manufacturer aperture and ventilation ratings. Review the state guidance at CAL FIRE Home Hardening.
Will vent covers cause moisture issues
They can if they reduce net free vent area too far. Use vents with published airflow values. Add vents if needed so you maintain required ventilation. If you see condensation, odor, or mold in the attic after a change, act fast. Restore ventilation with code compliant options that also resist embers.
How often should I clean gutters
At least twice a year, plus after wind events during fire season. Tree load dictates frequency. If needles or leaves drop constantly, consider metal gutter covers. Confirm that covers are metal rather than plastic. Keep the roof edge clean. UC ANR offers a plain language homeowner guide on gutter upkeep and wildfire risk.
Do I need a Class A roof to pass a home hardening check
Class A roofing offers the highest fire resistance rating under standard test methods. IBHS and CAL FIRE both encourage Class A roofs for wildfire zones. If your roof is due for replacement, choose a Class A system and pair it with sealed edges and regular cleaning. An old Class A roof with clogged gutters is still at risk. A new Class A roof with clean edges gives you a better shot.
What should I plant near the house
Within five feet, the safest choice is no plants at all, only gravel or hardscape. If you must plant, choose low resin, high moisture content species, with clear separation from siding. Keep beds free of litter and avoid wood mulch. From five to thirty feet, create breaks between groupings so fire cannot move across the yard in one sweep. Irrigate as needed to reduce stress during hot months.
Can I screen below my deck to stop embers
Yes. Use corrosion resistant metal mesh with apertures in the one sixteenth to one eighth inch range. Attach it to rigid framing. Remove vegetation and debris below the deck first. Keep stored items away from that under deck space during fire season. For design heavy or high deck projects, consult a contractor who understands wildfire resistant details for ledgers, joists, and posts.
Product research links worth saving
Keep these in your bookmarks so you can cross check any product claims.
CAL FIRE covers home hardening details including vents, roofs, gutters, and defensible space at CAL FIRE Home Hardening. IBHS shows clear priorities for homeowners at IBHS Wildfire Prepared Home. UC ANR breaks down vent types and screening options at UC ANR Fire Network vents. FEMA links readiness tips for property owners at FEMA Wildfires readiness. ASTM posts the E2886 standard summary at ASTM E2886.
A quick table for vent upgrades
| Vent location | Preferred upgrade | Acceptable retrofit | Notes on airflow |
|---|---|---|---|
| Soffit or eave intake | State Fire Marshal listed ember resistant soffit vent | Stainless mesh framed at one eighth inch or finer | Confirm total net free vent area remains adequate |
| Gable vent | ASTM tested baffle or intumescent vent | Rigid frame stainless mesh behind louver | Watch for driving wind exposure toward embers |
| Ridge vent | Wildfire rated ridge vent product | None, replacement usually required | Keep attic airflow balanced with soffit intake |
| Crawlspace vent | Listed foundation vent with ember barrier | Stainless mesh in metal frame | Maintain required vent area to prevent moisture |
| Dryer or bath exhaust | Metal hood with backdraft damper and screen | Metal screen upgrade, no plastic | Clean lint regularly to prevent clogging |
Wildfire home hardening is not a single project. It is a punch list you attack over a few weekends with smart priorities. Start with the five foot zone and your vents. Upgrade the roof edge and keep gutters clean. Pick siding that resists ignition. Close gaps. Repeat the maintenance cycle. During red flag weather, clear those few high risk items that love to ignite. If you want help, call us. We do this work because we have seen the difference a few upgrades make when embers show up uninvited.